Rechargable Lithium Ion Batteries
The Inside Story
by Bill Finch, March 8 2001
OK so here's the straight skinny about Lithium ion batteries and storage
vs state of charge. To start with, the Lithium technology used by Sony
is licensed from a company named AEA (ref 2). AEA manufactures mil spec
batteries for aerospace and the like. Sony has a license for terrestrial
use. Camcorder batteries are manufactured by Sony (ref 1) using a
lithium oxide cathode and a carbon based anode. Lithium ions travel
through a non aqueous medium during charge and discharge. These
batteries have a half life of about 1000 charge cycles (50% charge
retained at 1000 charge/discharge cycles).
Lithium batteries retain their state of charge (10% loss per month) much
longer than earlier technologies partially because a thin passivating
layers forms on the electrode surfaces. (ref 3) The chemical composition
of the passivating layer varies with battery construction chemistry ( a
deep dark secret ). The presence of a passivating layer can be
problematic if it grows to more completely block the anode and/or
cathode. Passivation thickness increases with increased storage time,
temperature, and state of charge.
The presence of a passivating layer ( essentially a high resistance)
always results in a voltage dip from the battery when a load is applied.
(see chart in ref 3) The magnitude and period of the dip is a function
of the passivation thickness. The layer thickness is decreased as a
function of coulombs transferred from the battery. This layer forms
every time you stop using a battery. The layer is removed every time you
use the battery.
In Camcorder use if the voltage drop is great enough, the camcorder will
shut itself off. This is a normal function in camcorder electronics. If
this does happen, the passivation layer can be removed by putting a pure
resistive load on the battery until the passivation layer is removed.
Choose a resistance value roughly equivalent to the load normally
presented by the camcorder. After a short period the passivation layer
will be completely removed and the battery will then function normally
in the camcorder.
Think about these facts until you digest them completely, then never
worry again about battery metaphysics.
That's all there is to it.
So, does this mean I'm going to partially discharge my batteries before
storage? No Way - too much trouble. It's like paying homage to the old
NiCd god. Also this uses up some of the batteries 1000 lives. Armed with
this understanding I do have a resistor handy, but so far I have never
had to use it over a period of about 3 years.
Bill Finch
References:
1)
www.sony-media.com/en/technical/lithium-ion.html
2} www.aeatbatsys.com
3} www.spectrumbatteries.com/Prod_in/passivation_information.htm
There is some information on rechargable lithium and other battery systems
online at Cadex, from the book
Batteries in a Portable World.
The charging time and run-time of the TRV900 with specific Sony batteries is listed in the owner's
manual on this page.
According to BatteryUniversity.com
a lithium battery's expected lifetime is 2-3 years (whether you use it or not), and less if stored above
room temperature. Some have lasted longer, but don't expect miracle recoveries if your battery
is older than this.
How to Fix A Lithium Battery
by John Beale 4/11/01
You can attempt to fix an InfoLithium battery which has developed passivation
by a process of charging and discharging several times. The TRV900 has a
built-in battery charger. When the camera is off, but plugged into the AC
adaptor, and the battery is on it, the battery will be charging (unless it
is already fully charged). When the camera is on and not connected to the
AC adaptor, it will run off the battery, eventually discharging it to the
point where the low-voltage cutout threshold is reached, where it shuts off.
To charge-cycle the battery you:
A) With battery attached to the camera, unplug the AC adaptor from the camera,
turn the camera on, and leave it on until it shuts off due to low battery.
Note: don't leave it in "camera" mode with a tape in, as
it will auto-shutoff after 5 minutes in standby. Instead select "memory"
mode, or "VTR" mode, where it will not auto-shutoff until the battery voltage
drops. Do not put the camera in a padded case when on, as it will get
rather warm.
B) Having discharged the battery, turn the camera off (leaving the battery
attached) and connect AC adaptor. The battery will now charge until it
is full.
C) Repeat steps (A) and (B) several times.
The above method worked for me with two
NP-F330 batteries that had develped passivation due to several months of
non-use. If after several tries the battery still dies
prematurely, then you have to adopt another method, see below.
Secondary charge-cycle method: resistor load
The TRV900 uses a 7.2 V battery and consumes between 3.9 to 5.2 watts of power depending on
operating mode. That implies between 540 mA and 720 mA of current, which would be drawn by a
resistor ranging from 13.3 ohms to 10.0 ohms.
So, you can simulate this load with a 10 ohm resistor rated to handle at
least 5 watts (If possible, I'd suggest 10 W or more). Unless you use a
physically large resistor, after a short time under load the resistor
will get very hot and can burn you so be careful. The tricky part is how
long to drain the battery with the resistor, as running the battery "flat"
may well do more harm than good.
If the battery is really fully charged,
then you should leave the resistor on as long as the "continuous recording time"
for the camera drawing that current. A 10-ohm resistor
corresponds to using the LCD screen, and a 13 ohm
resistor to using the viewfinder. For example, a charged NP-F330 battery with
a 10 ohm resistor load should take 50 minutes to discharge, while the NP-F750
should take 220 minutes. Runtime is listed for all operating
modes and battery types in
your owner's manual. That page is also online
here.
Battery Discharger Project
by Michael Ho 7/12/03
I owned a TRV900 since early 1999 and the unit is very good except I experienced
problem with the Lithium batter which dropped dead in about 10 minutes with
a full charge. From your posting, I built a very simple discharger
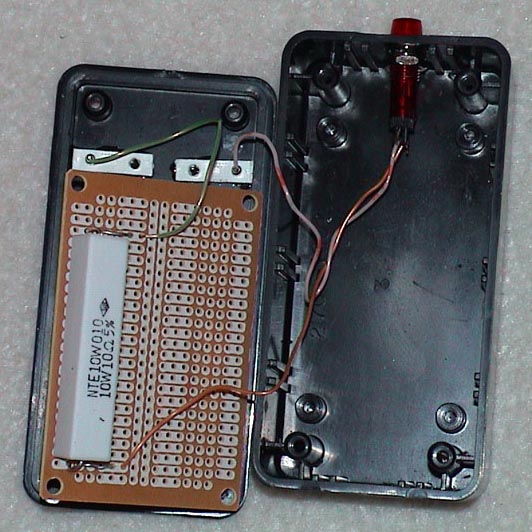
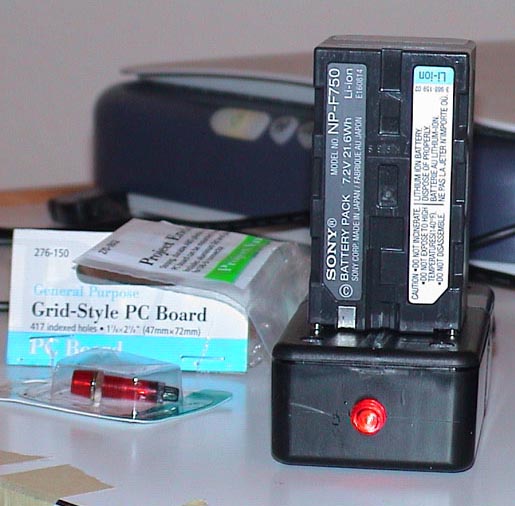
with an indicating light and would like to share this with all users.
The cost to built this discharger is slightly over $10 and I think its worth
to have the convenient to watch over it when the battery is discharging.
Most materials are from Radio Shack consisting of:
#276-150 Grid-Style PC Board
#272-331 Red Lamp assembly 12VDC 60mA
#270-1802 Project Enclosure
1 x 10 ohm 10W Resistor
2 pcs. connecting pin
The connecting pin is usually a part on a TV chassis for connecting between
the chassis and the DY assembly. I got this through my profession. Other
users might use similar PCB mount pin. Hope the attached photos give
a easier way to discharge the battery.


Thanks & rgds
Michael Ho
Note from J.Beale: the photo shows the light bulb in series with the 10 ohm resistor. The DC resistance
of this particular light bulb (12 V / 60 mA) is around 200 ohms so it limits current to a "trickle drain".
You could also connect the light bulb in parallel with the resistor, permitting current draw more like
the camcorder uses.
Experience restoring dead NP-F330 battery
by dh sullivan 4/20/01
My infamous battery is finally responding to my efforts. I can happily
report that it's up to 45 minutes useful capacity after two applications of
the Resistor Discharge method and several follow up charge/recharge cycles
in the camera.
It appears after over a week of experimentation that the resistor method is
far more effective than camera discharge/recharging, at least in the case of
this battery that was down to 5-7 minutes of useful capacity when I started.
I was ready to prematurely call the resistor method a failure because the
benefit was not immediately obvious, but soon realized that each recharging
after the initial drain with a 10 ohm/10 watt improved the battery quite
dramatically (compared to the very small improvements from vcr mode
discharging in the camera)
I decided to see if a second drain with the resistor would offer even
greater improvement. It indeed has. My battery continues to improve, and I
now plan to regularly rejuvenate my batteries with periodic full discharges
with the resistor method.
I have found that the battery should be fully charged before the resistor
discharge, and that rather than timing the discharge procedure, I can
effectively monitor the progress by simply placing a finger on the resistor
every five minutes or so after the first hour of discharge. The resistor
gets very hot initially, but as the battery nears the fully drained state
the temperature falls rapidly. I keep the resistor in the battery until it
has returned to ambient temperature for about five minutes. I find that
after this procedure the battery will show 2-3% charge when I start the
recharging process.
I would like to thank John Beale and others who have suggested the basic
methodology that got me started. The process has made me a firm believer in
fully draining my lithium ion batteries with a resistor periodically.
dh
From the standpoint of best long-term battery life, I would
suggest using resistor discharge if and when it seems necessary,
rather than as a preventative maintenance step on batteries which
do store a full charge. -jpb
Note: Several people on the TRV900 mailing list reported that
they have "killed" Sony
lithium batteries by leaving them on the camera while it was plugged
in to the wall over a period of months (eg. with the camera used for
desktop editing
purposes). I recommend removing the battery when using the camera on
AC line power.
The Cadex battery book mentioned above notes that Li batteries often
fail after 2 or 3 years even if not used, and recommends rotating
batteries instead of storing them.
If batteries are stored, aging is minimized by leaving
a 40% state of charge, and maintaining the battery at 15 deg. C.
Overall I am impressed with Sony batteries.
I bought a Sony NP-F750 battery along with my TRV900 in Sept. 1998.
In March 2002, I measured the runtime of this battery to be 84% of the
original Sony specified capacity
after 3.5 years of frequent use and recharging, and room-temperature storage.
I think this is excellent performance.
Lithium Battery Modifications
by Markus Lenggenhager, Jan. 3 2003
Stumbled across your page explaining how to restore a "dead" InfoLithium battery.
Very interesting! As an electronics engineer, I did exactly the same (discharge via
resistor) before knowing your page. The electronics contained in the battery
features an over-discharge protection, so it cuts off the flow of current at a
specific voltage. I didn't care about how long my resistor remained connected. At a certain
time the voltage across the resistor becomes zero, but as soon as you remove the
load, the battery voltage returns to 2.x volts (don't remember the exact value).
Also found another interesting page today, describing an alternate power
source while maintaining the InfoLithium circuitry:
members.fortunecity.de/kapmfs/e-liakku01.htm
1-2 years ago I was in touch with a guy in Germany who actually succeeded in
decoding the initial InfoLithium data stream which the camera must receive. He then
wanted to build a fake InfoLithium transmitter using a PIC microcontroller. But the
effort is high, much higher than for the combi solution (see link above).
Have 3 NP-FS11, 2 of them half dead. Will open one of them and attach nice
big Sony US18650GR cells I recovered from a dead Compaq notebook. They have 1500mAh
each.
Regards
Markus
Experience Restoring Lithium Battery
by Simon Falcon, April 16, 2003
I have restored my battery by using the instructions provided by John and
others with one extra step.
I first attempted to drain the battery and charge it using the camera
itself. I found that after four attempts I wasn't getting anywhere. I have
a NP-F550 battery that would die in 6 minutes. When placed in the camera to
charge the charge time would jump from nothing to 180 minutes and then go up
from there.
I decided to go the to secondary charge method and picked up a 10ohm 10watt
resistor. This method too seemed to kill the battery in about 6 minutes and
I got the same result when putting the battery back on the camera to charge
- no display at first then a jump to 180 minutes.
I thought I would see what would happen if I were to immediately remove the
battery from the camera after the 180 minutes appeared without letting the
battery charge - then put the resister across the terminal. Oddly enough
the resistor got hot for 10 minutes and then went cold again.
When I placed the battery back onto the camera it was blank at first and
then showed 170 minutes! I took it off immediately and put the resistor
back until it was cool and then slapped it on again - each time the battery
charge indicator showed a lower charge amount. I repeated the process until
the battery indicator was nil and then gave the battery a full charge.
It now works as it should.
Thanks for saving me $80!
Cheers,
Simon
Back to main page.